Free Guide Book to Zoom
The following chapter is out of The Online Meeting Survival Guide which can download for free here. Or purchase a paperback copy on Amazon here.
Brief Facts about Zoom Video Conferencing
| Topic/Feature: | Details: |
| Date Started | Founded in 2011 and launched in 2013 |
| Price | Freemium Model puts a 40-minute limit on free users (unlimited 1:1 meetings). Paid plans range from $14.99-19.99. |
| Meeting Participants | Maximum of 100-300. Varies with a plan (Enterprise supports up to 1,000). |
| Estimated Monthly Users | 300 Million |
| Breakout Rooms | Yes, paid users can host up to 50 breakout rooms which can be automatically or manually assigned. |
| Instant Messaging | Chat messaging available in-meetings and in-client |
| Unique Feature #1 | The intuitive control bar is easy to use yet powerful. |
| Unique Feature #2 | Robust security controls, updated after security flaw exposure in Q1 of 2020. |
Introduction to Zoom Video Conferencing
Zoom is one of the leading providers of video conferencing software. Just seven years after the company’s 2013 launch, Zoom has become the fastest growing online communications company in the world. With so many features, including a chat interface with cross-platform messaging and best-in-class video conferencing, many are turning to Zoom as their first choice to handle their changing technology needs.
Zoom’s popularity comes with good reason first, they back their feature-rich platform with a team of friendly customer service representatives. Eric Yuan the CEO of Zoom, has become an industry thought leader with a mission to “deliver happiness to users.” With all of that in mind, Zoom’s well-rounded platform has repeatedly been ranked number one in customer reviews on G2Crowd, TrustRadius, and Gartner Peer Insights, among other platforms.
The platform has a lot going for it, it’s easy to use and super reliable. Another standout feature is its interface which shows people in little “Brady Bunch” squares, neatly fitting up to 49 people on the same screen. The application is what technical investors call “sticky” meaning users get so attached to using it, they’d never think of switching to another. In this chapter, you will get an in-depth look into everything you need to know to be successful with Zoom.
Let’s get started!
Zoom Overview
One look at Zoom’s website will tell you how popular the service is. Zoom has testimonials from some of the biggest enterprises in the world, but Zoom’s not just for big-name companies, especially following the pandemic of 2020 forcing everyone to work from home. Zoom is now used by small and large businesses alike, as well as nonprofits, governments, institutions, and individuals worldwide, meeting an ever-growing demand for keeping people connected.
What Are the Main Zoom Services?
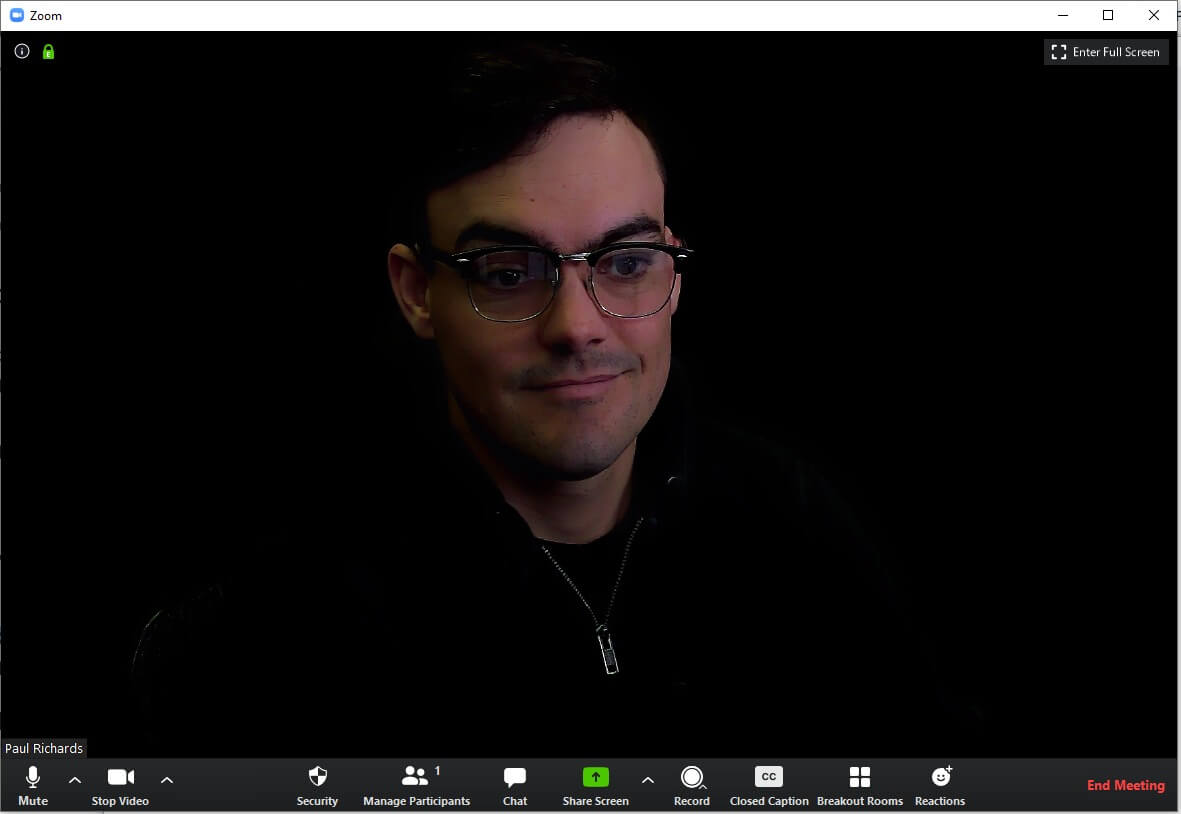
Zoom’s main service is video communications. The interface is simple enough for anyone to understand how to use it in just a few minutes. The application design features a video “front and center” style approach with a single control bar on the bottom.
The Zoom meeting control bar features simple icons that represent the microphone control, camera usage, participants, chat, screen sharing, recording, and reaction. Zoom maintains a simplistic and intuitive interface and many of these icons drill down to access deeper levels of control. Under the hood, Zoom offers many video conferencing features that its competitors do not. For this reason, Zoom has become a favorite for power users who host lots of online meetings. Users often choose Zoom for its long list of features, but the true beauty of Zoom is its reliability. People love using Zoom because its purpose-built design works for them 99.99% of the time with no need for IT support. The simplicity of the design makes users feel like they are in control of their meetings.
The simplicity of the design makes users feel like they are in control of their meetings.
Zoom’s features include:
-

Screen Sharing in Zoom Large Meetings: Support for up to 1,000 video participants on up to 49 videos on-screen at a time, all featuring HD audio and video.
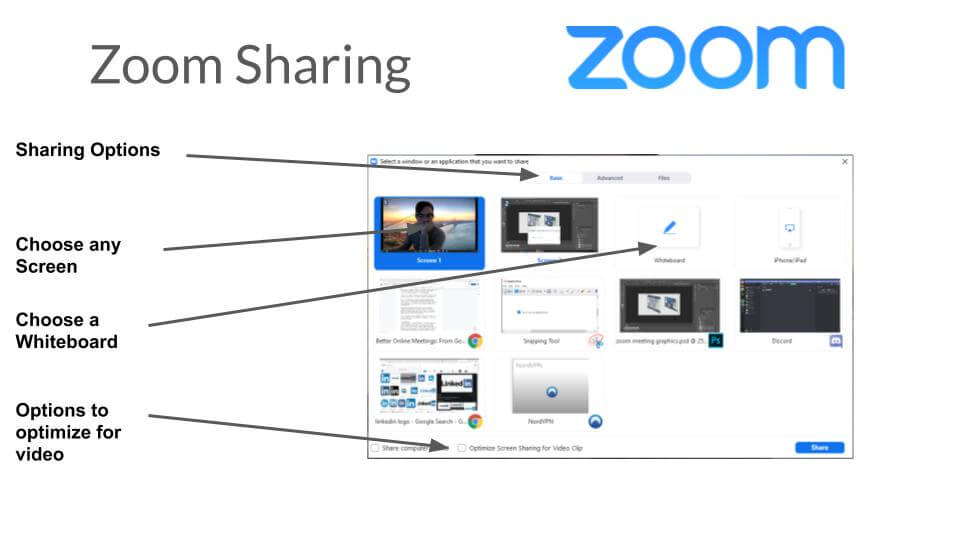
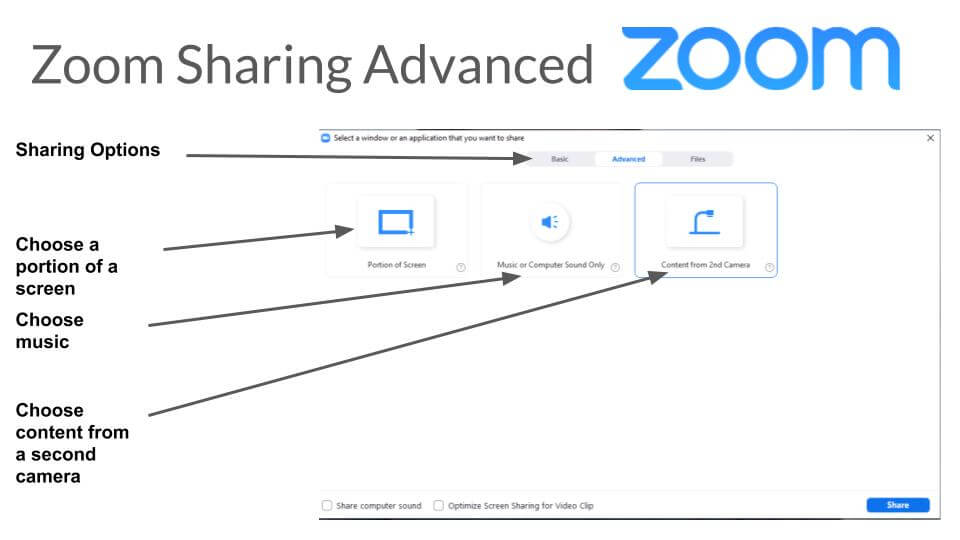
- Screen Sharing: Zoom’s screen sharing options are organized into Basic, Advanced, and Files tabs.
- The Basic tab gives you options to choose any screen on your computer with an option for whiteboards, iPhone/iPads, and any open window.
- The Advanced tab provides access to options for sharing specific sections of your screen, music only or a secondary camera.
- The Files tab will allow you to share specific files from Microsoft OneDrive, Google Drive and Box.
Collaboration: Built-in collaboration tools let participants share screens and whiteboards. Annotation tools add interactivity, so users can make dynamic presentations and explain documents with highlighters and digital ink. Annotation tools display at the top of the screen once a screen share session is in progress.
Security: Zoom offers role-based user security, password protection, the participant holds, waiting rooms, and encryption for every meeting. In 2020 a new focus on security made Zoom 5.0 one of the most secure solutions available. Zoom allows all paid users to select where their data is routed with options for selecting servers around the world. Next, a Security button on the meeting control panel gives users quick access features to lock meetings, enable waiting rooms, restrict participant screen sharing, chatting, and renaming themselves. Other meeting security measures such as meeting passwords still need to be set up before the meeting starts.
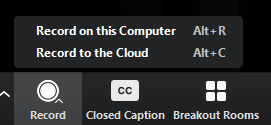 Recordings: Meetings are easily recorded and can be saved to the cloud or locally. Recordings saved in the cloud are referenced using searchable transcripts. Start a recording session by clicking the Record button and choosing a storage location. When recording, participants see a red icon on the top left corner of the meeting window. The meeting host pauses or ends the recording from the top left of the screen or inside of the meeting control bar. By default, recorded audio/video files are converted into .mp4 files or the host can also choose to save audio only (.mp4).
Calendars: Streamline scheduling and starting of Zoom meetings from other popular calendar platforms with plug-ins for iCal, Gmail, and Outlook.
Google Calendar Example
- Messaging: Team Chat lets groups interact with searchable history, file sharing, and a 10-year archive. Convert private chats into video calls with a click of a button.
- Zoom Phone: Zoom phone lets users upgrade a phone call to a meeting seamlessly.
Breakout Rooms: Meeting hosts can organize mini-meetings inside larger meetings by clicking the Breakout Room button and selecting the number of rooms and whether to assign participants manually or automatically.
Using Breakout Rooms requires management from a host. See the following table for the current limitations of breakout rooms:
| Number of breakout rooms | Max participants in the main meeting* | Max participants in each breakout room |
| 20 breakout rooms | Up to 500 participants | 25 |
| 30 breakout rooms | Up to 400 participants | 13 |
| 50 breakout rooms | Up to 200 participants | 4 |
*The large meeting add-on is required for meetings with up to 500 participants.
Now that you’re acquainted with Zoom, let’s take a closer look.
Online Meetings
With Zoom, you can host online meetings with ease or conduct training and collaborative think-tanks on one seamless platform. Zoom meetings delivers enterprise video conferencing complete with content sharing and unified communications.
The simplified interface is available for use across any device which makes starting and joining meetings a breeze. Zoom also syncs with your calendar system using plugins for Google Calendar and Microsoft Exchange. Zoom has also designed integrations for popular collaboration suites such as Microsoft
Video Webinars
Webinars are excellent for generating leads, conducting training within an organization, and in various other applications. Zoom’s facility for webinars is similar to regular Zoom meetings, but with added Q&A features for managing high attendee capacity. Zoom webinars let you host online events with up to 100 interactive video participants who can be upgraded from attendee roles to panelist roles who share access to audio and video controls. Or, select a Zoom webinar plan for up to 10,000 view-only attendees.
No matter the scale of your webinar, you’ll enjoy the easy set-up. When used for sales prospecting, Zoom integrates with marketing platforms to enhance the entire process. Registering is simple too. You can customize and brand your emails and registration forms to flow seamlessly with the rest of your website or organization. Flexible tools like registration management and multiple integration options ensure Zoom connects effortlessly with your CRM. Furthermore, you can even monetize your webinar using PayPal integration with Zapier to manage attendee payment for your webinar.
When it comes time to present, Zoom’s webinar controls are both simple and intuitive. Zoom’s presentation includes unique, multimedia options, to keep the audience engaged such as private and group chat settings for both attendees and panelists and an area for Q&A and polling with live or text-based answers.
A “hand-raising” feature increases participant engagement by allowing attendees to call your attention when they have questions. The Attention Indicator tracks how engaged your audience is throughout the webinar and shows you which viewers are taking the most interest. Since Zoom integrates with CRM solutions like Salesforce, the Attention Indicator proves truly valuable for follow-up after the webinar is complete.
 Conference Rooms
 Conference Rooms
“Zoom Rooms” takes video conferencing into the modern era, with an experience designed specifically for online meeting spaces. When it comes to usability, Zoom Rooms tackles the three biggest hurdles people face with virtual conference rooms: booking and starting a meeting, and sharing content. With Zoom’s standard features, such as HD video and audio, video conferences go off without a hitch, but Zoom Rooms takes things even further.
Zoom Rooms is designed to provide a control system for your conference room with “One-touch” on a device like an iPad, where one-touch join feature makes getting into a meeting truly simple, and one-click wireless share makes content sharing easy. And, when it comes to bookings, calendar integrations with Exchange, Google Calendar, or Office 365 means participants won’t be searching for meeting login details.
To support collaboration, participants can open up to 12 whiteboards at a time with annotation tools to help them work together. Co-annotation added across desktop and mobile devices is stored and can be shared for future reference. At no additional cost, Zoom Rooms also provides digital signage and a scheduling display. Plus, you can simplify your room deployment and with remote management, software provisioning, location hierarchies, role-based administration, and alerts…ultimately reducing your IT costs.
Zoom Phone
Global availability…from almost anywhere is possible using Zoom. Zoom Phone is an enterprise cloud-based phone system that enhances your traditional phone system with additional features for streamlined user experience. Now, escalating a phone call to a video meeting can be done with the click of a button.
Managing users, intelligently monitoring business interactions, and quickly provisioning resources is all made simple thanks to an intuitive and centralized Admin portal. Plus, Zoom Phone is highly reliable and secure, offering high-quality global distribution of HD Voice.
Zoom seeks to be the one unified platform that can manage a whole suite of business responsibilities. Zoom Phone extends these capabilities. Make and receive calls seamlessly while participating in video meetings, sending chat messages, sharing content, and more with Zoom’s mobile and desktop applications. Convert phone calls to Zoom Meetings without hanging up. Auto attendants and intelligent call routing make sure calls are connected securely and never missed. Convenient integrations with Microsoft Office 365, Google G-Suite, Salesforce, and others let users experience Zoom while still using their favorite applications.
Zoom Phone also features mail and call recording to allow you to quickly access transcribed messages or calls from any of your devices. Zoom Phone supports your current public switched telephone network (PSTN) service provider from anywhere in the world. Zoom Phone also supports VoIP devices such as those from Yealink and Polycom, among others.
Zoom Chat
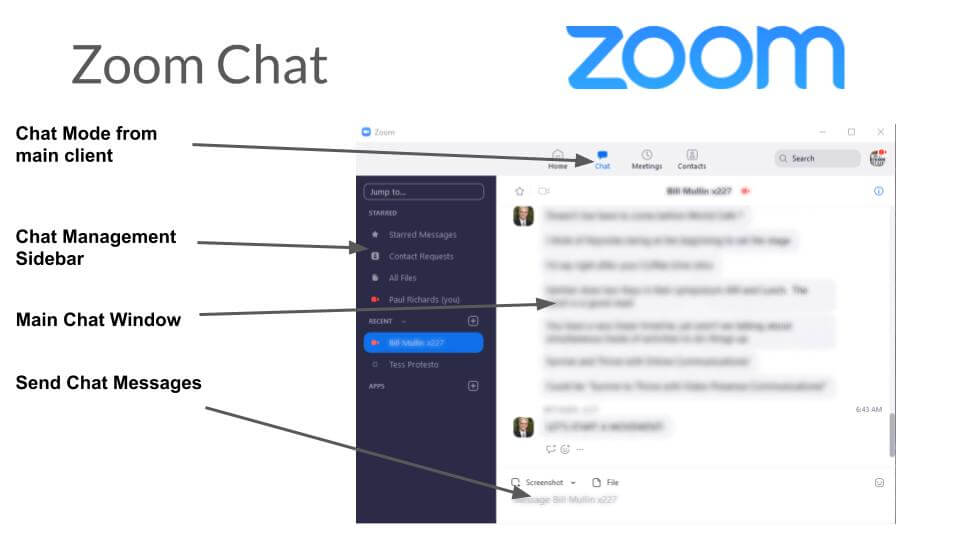
Subscribe to any Zoom plan and Zoom Chat is included with your license. Zoom Chat integrates right into meetings, webinars, and other tools within the Zoom platform. Knowing how to use Zoom Chat makes collaboration easier than ever, whether talking among teams in your organization or bringing in external participants.
With Zoom, file sharing, taking screenshots, using emojis, and searching across contacts, files, and messages is all possible. Calendar integrations sync with contact status to indicate who’s busy and who’s available (or not), no matter which device they’re on; whether desktop or mobile, when they’re on or offline–and that’s just the beginning.
With Zoom Chat, you can create a virtual workspace and add all the right people for your projects. Enabling file sharing and organized communications without any of the chaos associated with most web chats. Stay focused on the right stuff by starring your channels and contacts, customize your notifications to limit distractions, and organize what’s important to you.
How about being able to begin a group video from within a channel or starting a one-on-one meeting with anyone in a chat group. What if the meeting could even scale up to 1,000 people; each equipped with screen sharing and clear-as-a-bell, audio/video capabilities. To start a Zoom chat all you need to do is add contacts to the chat area. Once you’ve got contacts, off you go.
Wouldn’t it be great to be able to search messages for content and links? Zoom’s got that. A 10-year message archiving feature prevents accidental deletions. All of this and you can also be confident about security knowing that Zoom encrypts all the data all the time and guards the gates with SSO and multi-factor authentication.
Let’s Get You Started with Zoom
Because it’s so feature-rich, many new users are intimidated by Zoom. Zoom unifies group messaging, online meetings, and cloud conferencing into one tool. However, while so highly functional, Zoom remains intuitive and simple to use, whether you’re on a Windows, Mac, or Chromium Device.
Here are the steps to follow to get going with Zoom:
Sign In
After installing the Zoom desktop client for your device, you need to sign in. Yes, you can join a meeting without signing in, with credentials provided in a meeting, but to start or schedule your meeting you will need to sign in.
Sign in options include, using Zoom, Google, or Facebook credentials depending on how you set your account up. You can also use SSO (Single Sign-On). If you haven’t set up a Zoom account, click Sign Up Free. If you’ve forgotten your password, click Forgot to reset it.
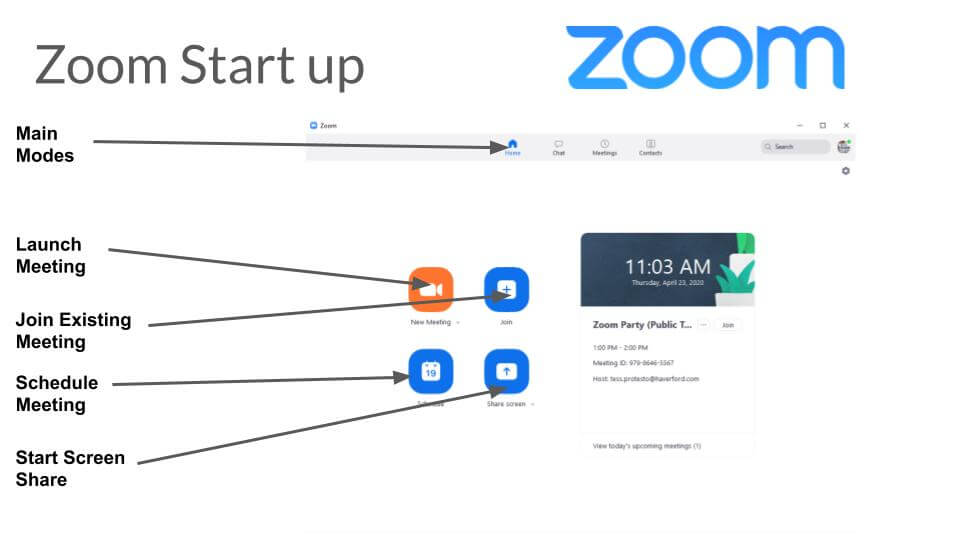
Home
Once you’ve signed into your account, the Home tab displays with the following:
- New Meeting: Instantly start a new meeting with or without video. Click the down arrow to enable video or use your PMI (Personal Meeting ID) to create an instant meeting.
- Join: Join a meeting that’s actively in progress or already scheduled with a Meeting ID.
- Schedule: Schedule a future meeting.
- Share Screen: Share your screen in a Zoom Room; with your sharing key or a meeting ID.
- Upcoming Meeting: Indicates the next meeting set for the current day. Add a third-party calendar to sync with your account to see all of your upcoming meetings.
One of the coolest options in Zoom is the ability to change your background image. Just hover over the picture and click on the camera icon to change it.
To explore additional options, click on your profile picture for the following features:
- Add a personal note.
- Change your status to Away, Do Not Disturb, or Available.
- Upgrade to Pro (if using a free account).
- Sign Out of your account.
- Switch to Portrait View for a narrower window.
- Use Chat, to view your private conversations with contacts or channels.
- Use Settings to change and update settings in the client.
- View My Profile tab, you can open the web portal to edit your profile.
- Access Help, for assistance from the Zoom Help Center.
- Check for Updates to ensure you have the latest version of the Zoom desktop client.
A left side panel on the main Zoom dashboard will open for access to new features depending on which tab you are currently on. The tabs include Home, Chat, Meetings and Contacts.
The Contacts tabs is a great tool for adding your people to Zoom. Select a contact or channel from the left side panel for the following:
- Star: Star a contact or channel for quick access.
- Video: Click the video icon to begin a meeting with a selected contact, or channel (to invite all its members to your meeting).
- New Window: Hover over a contact or channel name to see and click an icon to open the chat in a new window.
- Info: Additional options for the selected contact or channel with quick access to starred messages, images, and files within the chat.
- Message box: Sends a message to your contact or channel along with code snippets, GIFs, screenshots, or files.
- Phone: Select the Phone tab to begin a phone call, view call history, or send voicemail messaging with the Zoom Phone. Note: A Zoom Phone license is required to do so.
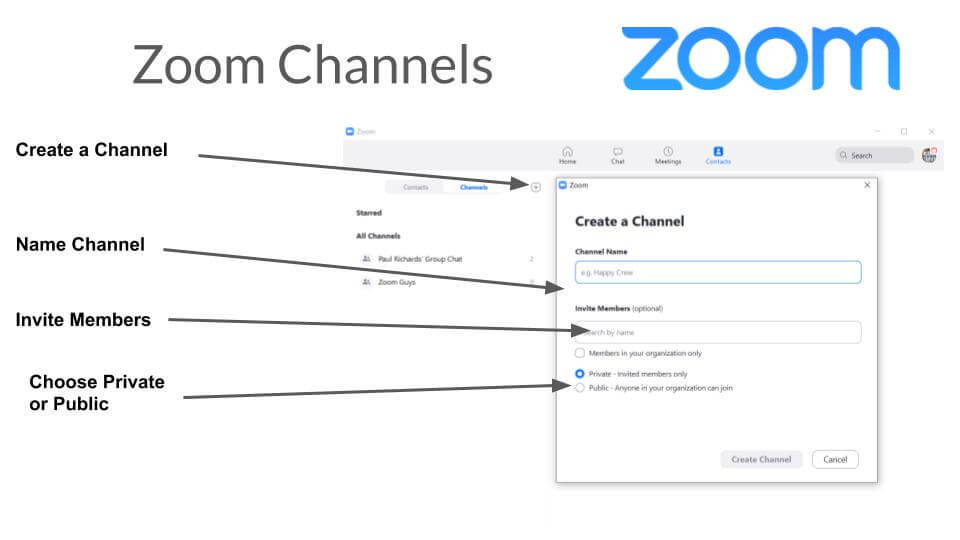
Create channels for collaboration. Channels help you track group projects and are a place to save conversations which can become video meetings. To start a new channel, click the plus button next to Channels and fill out the details. Making a channel public allows anyone in your organization to join. Notice each contact has a status icon before their name, letting you know if they’re available or not.
Meetings
After familiarizing yourself with the Zoom dashboard, it’s time to head over to the Meetings tab. This is the place to view, start, edit, and delete scheduled meetings.
Select a scheduled meeting to these options in the left side panel:
- Add: Click to schedule a new meeting.
- Refresh: Click to refresh the meeting list not seeing a scheduled meeting.
- Start: Click to start the scheduled meeting selected.
- Copy Invitation: Copy the invitation text from a meeting and paste it into an email or instant messenger.
- Edit: Edit the options for your scheduled meeting.
- Delete: Permanently delete the scheduled meeting.
Scheduling Zoom Meetings
Starting a Zoom meeting is as easy on the spot as it is in advance. Scheduling in advance lets you better manage options and increases security via optional settings like Recurring, helpful for weekly check-ins or classes when meets at the same time consistently.
Whether you’re using the desktop app, website, or even your mobile app, the process is very
Schedule a Meeting from Your Desktop
The steps to follow to schedule a meeting from your desktop is the same whether using Zoom in your web browser or through a desktop client.
On the Zoom.us website:
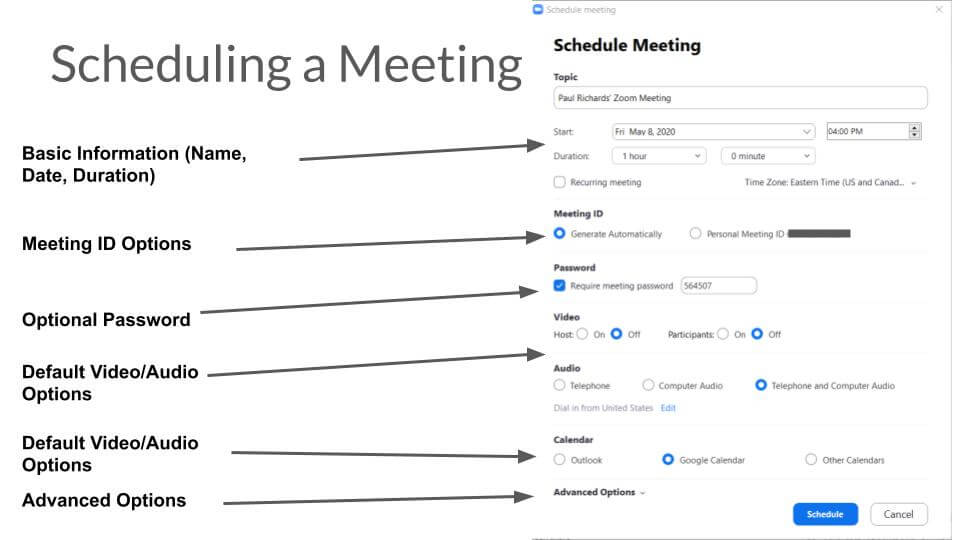
- Click the Meetings tab in the Zoom dashboard then click the + (plus) button. Optionally you can click the Schedule button directly from the Zoom dashboard.
- A form opens. Fill in the meeting details, including a date and time. Choose aRecurring meeting or a one-time meeting. Fill out all of the information and click Save at the bottom when done.
- For security consider adding a meeting password. Also, consider some of the Advanced options that can increase your meeting experience.
The waiting room feature places new meeting attendees into a waiting room area where they wait until manually admitted into the meeting. You can enable an option to allow participants to join the meeting before the host, mute participants upon entry, and automatically record the meeting.
Personal Meeting Rooms
Your Meeting ID (PMI) is a static meeting ID used to host meetings with people you trust. It’s important to guard your PMI because anyone who has it can join your meetings. You’ll use the PMI when starting or scheduling meetings. PMI’s are ideal for sharing in your email signature. A perfect example of the PMI is when a teacher uses the same PMI each week to meet with students for after-hours teaching sessions. The number is securely shared between students, and used for convenience.
Every Zoom user is also assigned a Personal Meeting Room. One useful tip to make this meeting ID number memorable is to use your 10-digit phone number. This personal meeting room is a virtual space, accessed with your PMI. Your Personal Meeting Room PMI is ideal for back-to-back meetings if the waiting room feature is enabled. This way, you stay in one central Zoom space without having to open and restart every new meeting. With the waiting room feature enabled, continue an existing meeting and let your next meeting attendee enter when you’re ready.
If you give someone your PMI link, they can add another person, unless you lock the meeting or use the Waiting Room. Enable “Join Before Host” to allow meeting attendees to join the room before you get there. As you can imagine, freely given PMIs can create some issues and it’s one of the biggest mistakes new Zoom users make when planning public or group meetings. Share your PMI with a bunch of people or even on social media… and suddenly anyone with that link can invade their Meeting Room.
We’ll dig into this more later on when we take a closer look at how to control access to your meetings. For now, what you need to know is how to use your PMI when it’s appropriate to do so. Most people select a setting to use their PMI to start instant meetings. The other option is to let Zoom generate a random ID. Set Zoom to always use your PMI for instant start meetings, in the Zoom web portal by clicking on your profile photo then clicking Edit next to your Meeting ID and checking Use this ID for instant meetings. Save your changes and you’re done.
What Not to Do with Your PMI
Zoom is a versatile tool that has gained massive popularity as the world demand for high-quality video meeting tools has grown. One particularly fun use case for Zoom is “public events” and large meetings with external guests. Public events invite all sorts of people to join a friendly conversation, watch a movie, jam music, or just share about anything imaginable. In the world of business, public events are also very useful as a tool for building interest among potential clients by inviting them to a live orientation or webinar-type event. When hosting public events, however, be mindful of how you set up the invitations.
Ideally, don’t your PMI for such events because too many people will end up having your PMI if you do. Instead, use the option to generate a random meeting ID. It’s best practice to use a random ID when:
- Sharing your PMI on social media.
- You aren’t yet aware of the best practices of Zoom privacy
- You don’t plan on meeting regularly
Fortunately, using a random meeting ID is effortless.
Generating a Random Meeting ID
When setting up a meeting, choose Meeting ID and Generate Automatically or to use your PMI. In either case, you can require a meeting password as an extra step of security to limit who may join. We will review information about meeting passwords and “two-factor authentication” a bit later.
Inviting Meeting Participants
Whether starting an instant meeting or scheduling one, there are several methods to choose from to invite participants. If you download the Cloud Room Connector add-on, you will be able to invite a room system. Additionally, you can invite by phone if you have an audio-conferencing plan. Without these additional add-ons, you can still use the following options.
Instant Meeting Invites
To start an instant meeting click Manage Participants at the bottom of the window, select Invite on the panel of participants, and choose from the following options:
Email is a quick and easy option, just select the Invite by Email tab and pick an email provider. The default uses the email application on your computer. Alternatively, you can use Google or Yahoo Mail, which will prompt you to sign into your email account.
An email is composed automatically, and all of the meeting information is placed in the body of the email. Just add the recipients and send it out.
Contacts
Click the Manage Participants option and go to Invite at the bottom of the panel of participants. Click the Invite by Contacts tab and select the contact’s name from the window. You can also search for a specific contact.
Click on an individual and their names display a checkmark next to them. They are also added to the list at the top of the window. Click Invite in the lower right corner to send the invitations to the selected contacts.
URL / Invitation Text
You can click Copy URL or Copy Invitation to send instant meeting info anywhere you wish. Copy the meeting join link for easy sharing or copy the full invitation to explain the meeting’s details alongside the invitation link. Right-click and select Paste or use Ctrl + V on Windows or Cmd + V on a Mac.
Scheduled Meeting Invites
Once you schedule a meeting, you can begin inviting participants. On the desktop client, after scheduling, go to your Meetings tab. Select the meeting you want to invite participants to and then click Copy Invitation. This copies the meeting invitation so you can paste it anywhere, like into an email or onto a social media page.
Through the web portal, sign in and click Meetings. Click on the topic of the meeting and, next to Time, you’ll see options for adding the meeting to your calendar.
If you select Yahoo Calendar or Google Calendar, it will automatically create an event in your calendar synced with the email service you choose. Click Outlook Calendar to generate a .ics file you can import into your Calendar.
You can also manually copy the invitation. Another window opens with the meeting invitation text. Click Select All in this window, copy it, and then send it through email or chat.
Joining a Test Meeting
Use Test meetings to try out your setup and get accustomed to Zoom before you’re put on a spot in a real meeting. While Zoom is intuitive and easy to use, it’s certainly worthwhile to try a test meeting at least once, especially if you want to become a Zoom Pro!
Joining a test meeting is easy. On a mobile device, visit http://zoom.us/test and follow the instructions shown to test your video or audio. Otherwise, visit http://zoom.us/test on your desktop and click the blue Join button.
The browser will prompt you to “Open Zoom Meetings.” If you do not have the desktop client installed, follow the prompts. When the desktop client is open, a test meeting displays in a pop-up window. This is where to test your speakers for audio output by clicking the Test Audio button. If you don’t hear a ringtone play use the drop-down menu to switch your speaker selection.
When you hear the ringtone play, click Yes, and continue the microphone test. When your microphone is working, you’ll hear audio replay through your speakers. If you don’t hear a reply, click No to switch microphones and repeat the process until you hear the replay. Click Yes when you hear the replay.
The next thing to do is click Join with Computer Audio to join the test meeting with the microphone and speakers you just tested. You will now be an attendee of the test meeting. This is an excellent opportunity to learn about how attendees see your video feed and to get used to some of the controls.
Of course, your setup might not be perfect at first. In the next section, we’ll dive into the details for preparing your audio and video for perfect streaming. Then we’ll look at screen sharing and some other features you’ll want to take advantage of as you become a Zoom Pro.
Preparing Your Audio
Always test your audio before a meeting. To check your computer’s audio, click on the arrow next to the mute icon. This opens up a list of Audio options where you can select Test Computer Audio to test your speakers and microphone.
The test will give you the necessary prompts to complete. When finished, simply close the testing window. Zoom works with external speakers and microphones along with headsets.
A simple way to make sure your microphone is working is to look for the green “levels” that display inside of the microphone icon on the lower left of the screen. If a red strike is showing up through the microphone icon, then you are currently muted. Unmute by clicking on the microphone icon.
Using Push to Talk
Zoom is filled with features that help make attending and running meetings a breeze, and “Push to Talk” is one feature that helps you avoid unwanted chatter while making sure everyone has an easy, convenient conferencing experience.
Enable the Push to Talk feature to avoid constantly muting or unmuting. To enable it in the desktop client, click on your profile picture and then go to Settings. Click the Audio tab and check the option to “Press and hold SPACE key to temporarily unmute yourself.” Save your settings. With this enabled, you will be muted by default. To talk, you just hold down the space bar.
Troubleshooting Issues
An audio echo is one of the most common audio issues to troubleshoot. An echo is usually due to one of three things:
- Having both computer and telephone audio active
- Having a computer or telephone speakers too close to each other
- Having multiple computers with active audio inside the same room
There can also be audio interference from a bad microphone, speakers being too loud, or an echo cancellation failure (which is a device performance issue). As a host, you can mute an attendee to silence the issue or mute everyone to ensure no interference. The attendee can also mute themselves until they sort out the issue.
Preparing Your Video
A test meeting can test your video. However, beyond ensuring your camera is active, there are also some other details and settings you may want to address.
Rotate Your Camera
For Windows users, the camera may display upside down or sideways. To fix this, rotate the camera in your settings section until it’s correctly oriented.
If you find this is an issue before a meeting starts, log in to your Zoom client, click your profile picture, go to Settings and then the Video tab, hover over your camera’s preview, and click Rotate 90° until it’s oriented correctly.
If you’re in a meeting and notice that you need to rotate your camera, click the arrow next to Stop Video and choose Video Settings, hover over your camera’s preview, and rotate the camera with the Rotate 90° button until it’s oriented correctly.
Use A Virtual Background
Virtual backgrounds allow you to change the setting behind you, which can certainly be fun. This feature works best with even lighting and a green screen behind you. The solid green color from a green screen helps Zoom distinguish between you and your surroundings. However, a solid wall will also work. Using a virtual background is straightforward and simple to set up.
You’ll get the best results if you:
- Use a solid background color, preferably green.
- Use an HD webcam.
- Use uniform lighting throughout your space.
- Do not wear clothing that matches your background or virtual background.
- Use a background image with an aspect ratio of 16:9 and a minimum resolution of 1280 by 720 or use a video with a minimum resolution of 360p and a maximum resolution of 1080p.
To enable a Virtual Background, sign into the Zoom web portal, and go to My Meeting Settings or Meeting Settings. Navigate to the Virtual Background option in the Meeting tab and verify its enabled. If it’s disabled, toggle the Status to enable it. If a verification dialog pops up, click Turn On.
If the option is grayed out, Virtual Backgrounds may be locked out at the Group or Account level, which means you need to contact your Zoom administrator.
For the setting to take effect, log out of the Zoom Desktop Client and then log back in again. Within the desktop client, click on your profile picture and go to Settings. Select Virtual Background and check whether or not you have a green screen. Choose an image to use as your background.
You may need to download the “Smart Virtual Background” package to use a virtual background without a green screen. You’ll only need to do this once. To enable it just click the ^ next to Start/Stop Video and select Choose a Virtual Background.
Touch Up My Appearance
The “Touch Up My Appearance” option puts a soft focus on your video display, helping to present a more polished look by evening out your skin tone on screen. To activate this, login to your Zoom client, go to Settings, and then Video. Alternatively, during a meeting, click the arrow next to the video icon and choose Video Settings.
Once you’re in the settings dialog, click Touch Up My Appearance and check the option to begin displaying touched up video. Zoom will remember your preferences for future meetings, so it will stay active until you turn it off.
Screen Sharing
Share your screen in a meeting by clicking the green Share Screen icon in the center of the bottom control bar. While a host doesn’t need to give attendee permission to share their screen, they can prevent attendees from screen sharing by changing their settings. Here are some other options you may want to look into when it comes to screen sharing.
Side-by-Side View
When screen sharing, participants can switch to side-by-side mode, which allows them to see both the screen being shared and the Speaker View or Gallery View of participants. In side-by-side mode, you can adjust a separator between the shared screen and video stream(s).
When viewing a screen in a meeting, click Options then select Side-by-Side Mode to enter this Split Screen. The shared screen displays on the left and the speaker(s) on the right. To leave side-by-side mode, go back to Options and uncheck it. The screen being shared takes over the window with the speaker(s) shown along the top.
Annotations
Annotation tools are extremely helpful for hosts and participants, but the first thing you need to do is adjust your settings to enable annotations. As a host, you’re in control and can turn annotation capabilities on or off for the participants.
When sharing your screen or opening a whiteboard, you’ll see the annotation controls pop up. If they don’t, select View Options and then select Annotate.
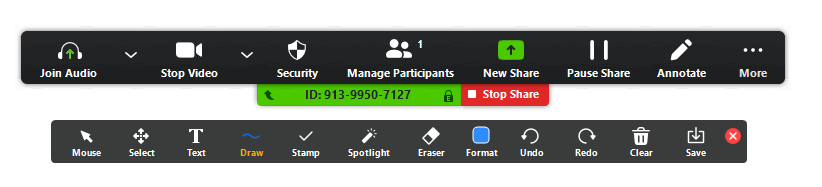
Note that the Select, Spotlight, and Save options are only available to the person sharing the screen or whiteboard. Viewers will not see those options. Below is a description of each annotation tool and option:
- Mouse:Turn off annotation tools and redisplay your mouse pointer by clicking the Mouse button. It’s blue when you’re using your mouse pointer and the annotation tools are off.
- Select: Use this option to select, move, or resize annotations. Select several annotations by clicking and dragging your mouse over them.
- Text: Insert text onto the screen or whiteboard.
- Draw: Inset lines, arrows, or shapes onto the screen or whiteboard.
- Note: Use this to highlight an area of the shared screen or whiteboard with a semi-transparent square or circle.
- Stamp: Insert predefined icons, like a star or check mark.
- Spotlight / Arrow: Turn your cursor into an arrow or spotlight.
- Spotlight: Display your mouse pointer to participants when sharing your screen or whiteboard to point to things you want participants to pay attention to.
- Arrow: Display a small arrow in place of your mouse pointer. Click to insert an arrow that displays your name next to it. Click somewhere else to remove the last arrow you placed.
- Eraser: Click and drag to erase annotations.
- Format: Change the formatting options for your tools, including line width, font, and color.
- Undo: Undo the last annotation.
- Redo: Redo the last annotation that you undid.
- Clear: Remove all annotations from the screen or whiteboard.
- Save: Save all annotations as a screenshot.
Use a Watermark
When sharing your screen, select the Watermark feature to superimpose an image onto the shared content and the video of the person sharing the content. Start by logging into the Zoom web portal. Select Account and then Account Settings and find the Add watermark option in the Meeting tab to make sure the setting is enabled.
To use a Watermark, schedule a meeting. Go to Meeting Options and enable the Enable watermark when viewing the shared screen option. If you don’t see these options or you’re not able to activate them, you’ll need to ask your Zoom Administrator to make the changes for you.
With the Watermark, when a participant shares their screen during the meeting, a portion of the email address of the person viewing the content is imposed on the shared content as well as over the active speaker’s video. For example, if someone with email [email protected] is viewing shared content, the word Testing is imposed over the video.
Zoom Meeting Controls
There are several controls you should familiarize yourself with to use Zoom effectively. Start by learning the basic controls before looking at some of the more important advanced options you can utilize.
Basic Controls
When participating in or running a Zoom meeting, you’ll notice a number of options within the Zoom window. Here’s a look at what you can do with them.
- Mute or Unmute Microphone: Control audio; when others in the meeting can hear you.
- Start or Stop Video: This setting allows you to start or stop your video capture but allows you to remain in a meeting as audio only.
- Change View: Use this option to change your video display layout.
- Speaker: This option lets you view video of the active speaker.
- Thumbnail: This option lets you display the video of the active speaker with other attendees’ videos displayed in thumbnails below the active speaker.
- Gallery: The display of every meeting attendee in a grid.
- Camera Control: Use this to change the PTZ camera settings and presets or to switch to a different camera. This feature is enabled by an administrator. To control the PTZ camera on the far end of a video call, request camera control by right clicking a participant’s video.
- Participants / Manage Participants: View meeting participants. The host always manages participants.
- Invite: Invite Zoom contacts here or invite them using the email, phone, or room system.
- Start Recording: Start recording to the cloud or your local drive.
- Settings: Use the room passcode to access room settings.
- Volume Slider: Adjust the volume of the room’s speaker. This resets to default at the end of each meeting.
The Zoom basic controls are used most often and fairly self-explanatory. There are also advanced controls.
Advanced Controls
As with any public gathering, virtual meetings require advanced controls for crowd management. Whether its individuals disrupting the event or solos who managed to find an invite not intended for them, Zoom pros should know how to handle intrusions.
Manage Screen Sharing
Perhaps the biggest mistake new Zoom hosts make is releasing control of their screen. Never let an unknown person in a public event take over your screen or you may end up sharing unwanted content with everyone in the meeting. Always restrict screen sharing before and during the meeting with the host control bar. Select the option to only allow the host to share their screen during a public meeting
Find host controls at the bottom of the window and click the arrow next to Share Screen. Under Advanced Sharing Options, change Who can share to Only Host. In your web settings, you can also lock the Screen Share settings to Only Host by default for all of your meetings.
Manage Your Participants
Zoom options for public events let you host with full confidence. For instance, you can opt to restrict events so that only signed-in Zoom users can join. When a participant asks to join and they aren’t logged into Zoom, they’ll see a login prompt. The Authorized Attendees setting is another way to control your guest list.
Hosts can lock meetings after all the authorized participants have joined. Think of this as locking your meeting’s front door. With a meeting locked, no one else can join, even with a meeting ID and password. To lock a meeting, click Participants at the bottom of your window then click the Lock Meeting button.
To remove unwanted participants during a meeting, use the Participants’ menu. Hover over a participant’s name and click Remove to kick them out of a meeting. Toggle the setting to allow them back in if you accidentally remove the wrong person.
Place an attendee’s video and audio connections on hold to temporarily disable them by clicking a participant’s video thumbnail and selecting Start Attendee On Hold to activate. You can take them off hold when you are ready to have them participate again.
You can similarly disable someone’s video or mute them. Participants can be muted one by one, or all at once. Mute Upon Entry is useful to avoid clamor in, particularly large meetings. Select whether you want attendees to be able to unmute themselves or not. For large public meetings, it’s helpful to have a co-host to help you manage who gets un-muted using the raise hand feature. Make any meeting attendee a co-host by giving them additional meeting control capabilities from the Participants tab.
Hosting a Breakout Session
A breakout room lets you split a Zoom meeting into up to 50 separate sessions. The host of the meeting can choose to split participants into separate sessions manually or automatically and can switch users between sessions at any time. This is a great feature for allowing small teams inside a larger group to have specific conversations outside of the main video conference.
The Zoom Administrator of your account needs to enable Breakout Sessions for users to access this feature. Once enabled, meeting hosts can enable or disable this from the Breakout Room button that displays. Meeting hosts can assign participants to specific breakout rooms or make participants co-hosts who can move in-between breakout sessions themselves.
When managing breakout rooms, an important tip is to pre-assign users to specific rooms when scheduling the meeting. Alternatively, set things up so users are assigned automatically. Realize that users within a break room have full audio, video, and screen sharing capabilities.
You can set up the following options for your breakout rooms.
- Automatically move participants into breakout rooms. Check this option to automatically move participants into breakout rooms. Without checking it, participants need to click Join to be added to a breakout room.
- Allow participants to return to the main session at any time. Check this option so participants can choose to move back to the main session with their meeting controls. If you do not check it, they will have to wait for the host to end breakout rooms for everyone.
- Breakout rooms close automatically after X minutes. If you check this option, breakout rooms automatically end when the specified time is up.
- Notify me when the time is up. Check this option so the host of the meeting is notified when the breakout room time is up. This is a helpful alert if you step away from your meeting.
- Countdown after closing breakout rooms: If you check this option, participants are shown a countdown of the remaining time until the breakout rooms will end and they are returned to the main session.
When managing breakout rooms, an important tip is to pre-assign users to specific rooms when scheduling the meeting. Alternatively, set things up so users are assigned automatically. Realize that users within a break room have full audio, video, and screen sharing capabilities.
Distraction Management
Zoom features in-meeting chat and private messaging for meeting participants. These can both be toggled on and off to prevent distractions and ensure no one gets unwanted messages during a meeting.
Another option you’ll want to be familiar with as a host is the ability to turn off file transfer. While in-meeting transfers can be helpful by allowing users to share files via in-meeting chat, toggling it off prevents users from being bombarded with GIFs, memes, and unsolicited content.
Disable annotation, which allows attendees to doodle and mark up content during screen share, when needed to prevent people from writing all over the screen.
Conclusion:
Zoom’s become a leader in video communications because their tool is easy to use, and that’s a major feat considering how many advanced features are built into their service. Zoom continues to enjoy incredible growth and its product truly leads the way forward for the industry. While Zoom doesn’t offer the integrated online workspace solutions of Google and Microsoft, it’s superior performance for video conferencing makes it a must-have for many professionals. Next, let’s take a look at Facebook’s new video conferencing features.
[xyz-ihs snippet=”Online-Meetings”]