Add Auto-Tracking Capabilities to your Webcam
In this video, we will demonstrate how to give your HuddleCamHD webcam auto-tracking capabilities using Open Broadcaster Software (OBS), a free application available for Mac, PC, and Linux computers. Adding auto-tracking functionality to your camera can make your videos and live streams more interactive without being distracting to viewers.
Auto-Tracking is particularly useful when someone is moving around during a presentation. If you are using auto-tracking in a setting where speakers are sitting, the feature can still be useful, but we recommend tuning the tracking sensitivity to make subtler adjustments to your video.
Steps:
- Download and Install OBS
- Download and Install Face Tracker Plugin
- Add Webcam Video Source to OBS
- Add Face Tracker Filter to the Video Source
- Configure the Face Tracker Filter Parameters

Step 1 – Download and Install OBS
To get started, download OBS at OBSProject.com. OBS is a great software for recording video and live streaming. It can also be used to send a virtual webcam output to any software which accepts a webcam such as Skype, Microsoft Teams or Zoom, so anything you produce inside the OBS software can easily be recorded directly to your computer, live streamed to social media, or sent directly as a webcam source to another video software in real time.
Step 2 – Download and Install Face Tracker Plugin
Download the Face Tracker plugin here. When the download is finished, open OBS.
Step 3 – Add Webcam Video Source to OBS
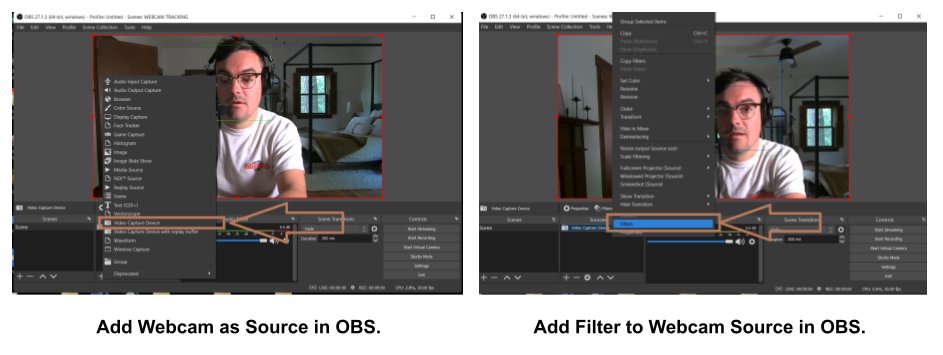
Use the “Sources” area of OBS to add your webcam. Click the “+” button and select “Video Capture Device.” Here, you can select your webcam from the dropdown menu. Once you have selected your source, click “okay” and you should see the webcam in your list of Sources. You can now right click the source in order to add the Auto Tracking feature as a Filter.

Step 4 – Add Face Tracker Filter to the Video Source
Right click the source and select “Filters.” Click the “+” button in the “Effect Filters” area and select “Face Tracker.” Face Tracker is designed to automatically identify a face and start tracking that face with the default parameters. If the software is working well with the default parameters, you are all set to use OBS as your auto-tracking camera engine. You can enhance your video further with additional filters and settings available in OBS. For example, you may want to do some basic color correction or image sharpening of your image in OBS.
Step 5 – Configure the Face Tracker Filter Parameters

If you need to customize the parameters of Face Tracker you should start with the “Tracking Target Location” and make sure your face is centered in frame at the zoom level you desire. Start by selecting the “Zoom” and the “Scale Max” options which will determine how much your camera will zoom in during auto tracking. A good starting place is to set Zoom to .7 and Scale Max to 2.0. The further you want the camera to zoom in the higher you can adjust the Zoom Max parameter. You can then adjust the X and Y parameters to adjust how much space you want around your tracking zoom.

Once you have the Tracking Target Location configured, you can adjust how quickly you want the tracking to happen by adjusting the parameters in the “Tracking Response” section. If you want the tracking movements to slow down, adjust the “Kp” setting from the default “.95” down to a lower setting such as “.5”. You can continue to adjust the tracking parameters to get the auto-tracking dialed in to fit your needs.

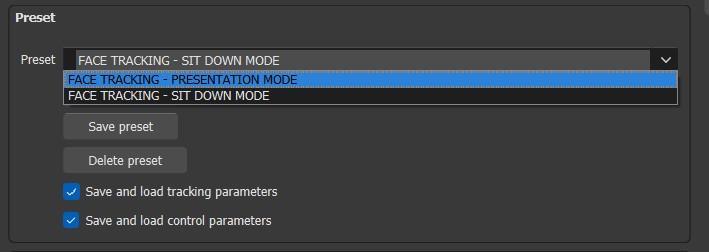
Once you are done, you should create a settings preset by entering the name of your preset at the top of the filter settings area. Click “Save Preset” and you will see that your preset is saved for future use. This is ideal for saving and recalling new presets for different presentation settings that you can use for auto-tracking.
What are you waiting for? Give it a try! To add auto-tracking to your HuddleCamHD camera, install the OBS PTZ plugin here and get started.
Questions? Reach out to [email protected] for assistance.

